How to Draw A Bubble Letter O Easily
How to Draw A Bubble Letter O. In theory, the letter O should be easy to write and draw. Whether it’s the lowercase or uppercase version of the letter, it’s just a circle.
Also, check our Simple Dolphin Coloring Pages.
As for writing, it is definitely one of the easiest letters to learn. In this guide, we’ll show you that you can make even this simple letter really interesting.
To do this, we’ll turn this simple letter into an awesome bubble letter, “O”. This makes the letter more complicated but also a lot cooler.
In addition to explaining how to draw this letter, we’ll tell you some ways to customize it and make your drawing even better.
So we start with the first of six steps that will show you how to recreate this amazing design for this letter that you can customize yourself.
How to Draw A Bubble Letter O
Step 1
As mentioned in the introduction to this guide, the letter O is a fairly easy letter to write. Nevertheless, we recommend that you draw instructions with a pencil yourself.
To do this, draw a circle with a light-colored pencil or very light pressure. You should try to make it the size you want your final design to be.
It doesn’t have to be a perfect circle either, as this is just for guidance when you later start drawing the final lines of the bubble letter version.
Whether you are drawing a pencil guide or just trying, we can start drawing the letter itself. You should choose a drawing tool that is comfortable for you.
We like to use sketch markers because they make the lines a lot thicker, but you can use whatever you like.
The first line we draw is in the upper curve of the letter. The reference image shows you where this line should be and what curve it should have.
Once we’ve drawn the letter, the next step is to start drawing some more of the letter.
Step 2
In the next step we draw the curved part on the left side of the image. As you can see in our reference image, the next part of the letter starts where the previous line ended.
If you can draw those first two steps at once that would be perfect, but it’s fine if you break it into two steps. There is a fairly sharp turn on this line.
When drawing a rounded line like this, it’s easy to get confused. So don’t be afraid to take it slow and really focus on keeping the line nice and smooth.
Once you’ve drawn the next section of the letter, you can skip to step 3 of the guide to continue.
Step 3
In this third step of this guide we will already finish the outline of your bubble letter “O”. There are several ways you can do this.
One would be to repeat what you did in the first two steps. This could be accomplished by mirroring images of these steps.
This means draw a smaller curved line at the top right of the letter, and then a longer line going down and meeting at the base.
If you feel confident, you can just draw it in a solid line starting at the top or bottom of the O outline.
Once you have completed this pattern you can erase any pencil lines you drew to help in step one as we no longer need them.
Then, in the fourth step, we can start drawing the inner outline of the letter!
Step 4
In this step we’ll draw the hole section of the O. It might be tempting to give it a simple circle shape, but we want it to look like a bubble.
In particular, the way we draw the hole in the O makes it look like the letter was cut out of a balloon.
To do this, we draw the hole in a shape that looks a bit like an onion. It starts with a slightly curved line protruding from the top.
It is then rounded off to create a largely round shape. It will be slightly thinner at the top and the line at the top will overlap and stick together.
It may sound complicated, but it’s a lot simpler than it seems. Just follow the reference image and try to make your own as close to this image as possible.
Once you’re happy with how the outlines of the inside and outside edges look, you can move on to step 5 where we’ll add the finishing touches!
Step 5
The outline of your letter is ready and now we will add some simple details to complete it. As we’ve drawn it so far, it already looks like a bubble.
The little details we’re going to add now will help it look more like a bubble, so let’s add them now! First we’ll add a small oval shape at the top.
This is to replicate the appearance of the light reflected from the letter. If you wish, you can also draw this oval in a different place of the letter.
It would also be nice if you added more reflective dots, but if you add too many it might be less effective.
Keep in mind where the light source of your image is and make sure the reflective parts match it.
Next we draw the lines that will add more depth to this letter. You can add them near the outline of the letter.
In our reference image, we showed you some places where you could draw these lines, but be sure to play around with them!
Before moving on to the final step, you can add more patterns, shapes, or background details to your artwork.
Step 6
This is the last step of the tutorial and it’s fun! It’s time to grab all of our favorite painting tools and media while we add some color to your drawing.
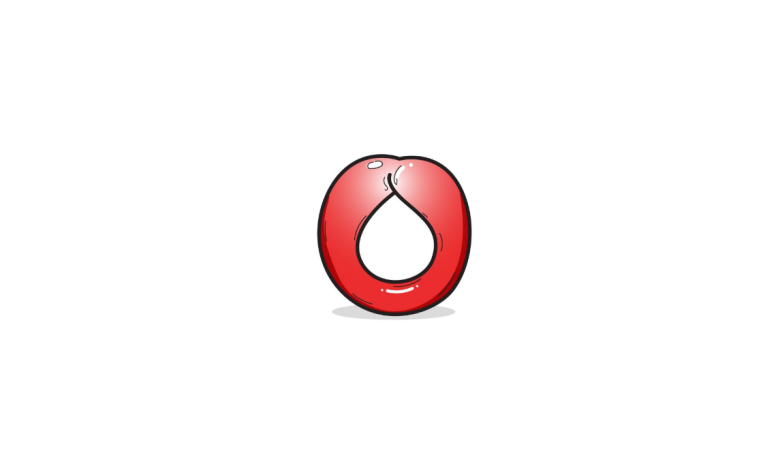
In our example, we only showed you one way to color your drawing. We chose a warm red color scheme to make it look nice and inviting.
To reproduce the look of a balloon, we made the colors lighter at the top of the letter and darker at the bottom.
You can choose similar colors for your design, but you can choose any other color you like!
No matter what colors you choose, you can achieve a similar effect by using some dark and some light shades of the colors you have chosen.
It might also be fun to create color patterns, stripes, or shapes within the O. So you can use all your favorite colors.
Not only can you play with colors, but you can also try different artistic tools and mediums to make the colors stand out and make them look as beautiful as possible.
Before we close this guide entirely, let’s look at some ways you can make your drawing even more unique with some fun ideas for you to try!
Your Bubble Letter O Drawing is Finished!